
Light and shadow are two of the most powerful tools in photography. They define shapes, create depth, and add emotion to an image. Whether you’re capturing portraits, landscapes, or still life, mastering the interplay between light and shadow can take your photography to the next level.
By strategically using light and shadow, photographers can create a sense of three-dimensionality, making images feel more dynamic and engaging. Shadows add contrast and texture, while highlights draw attention to key elements in a composition. Beyond just technical aspects, light and shadow also play a crucial role in storytelling. A well-lit scene can evoke warmth and happiness, while deep shadows can create mystery and drama.
In this article, we will explore how to harness light and shadow effectively to enhance the depth of your images. You’ll learn about different lighting techniques, composition strategies, camera settings, and post-processing tips to bring more dimension and visual impact to your photos. Whether you’re a beginner or an experienced photographer, these insights will help you elevate your creative vision.
Understanding Light and Shadow in Photography
Light and shadow are fundamental elements in photography, shaping the way an image is perceived and adding a sense of dimension and depth. Understanding how to manipulate them can transform ordinary shots into striking visual compositions. In this section, we’ll explore the role of light direction, the difference between hard and soft shadows, and the impact of natural and artificial light sources.
The Role of Light Direction
The direction from which light falls on a subject significantly influences the mood, depth, and overall composition of an image. There are three primary types of light direction:
- Front Light (Flat Lighting): When the light source is positioned directly in front of the subject, it reduces shadows and creates an evenly lit image. This setup minimizes depth but works well for portraits where a soft, even complexion is desired.
- Side Light: A light source positioned to the side of the subject emphasizes texture and form, creating strong highlights and deep shadows. Side lighting is often used in portraiture, still life, and architectural photography to add depth and drama.
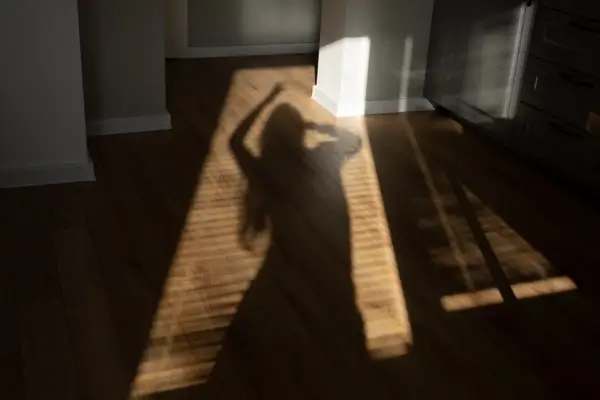
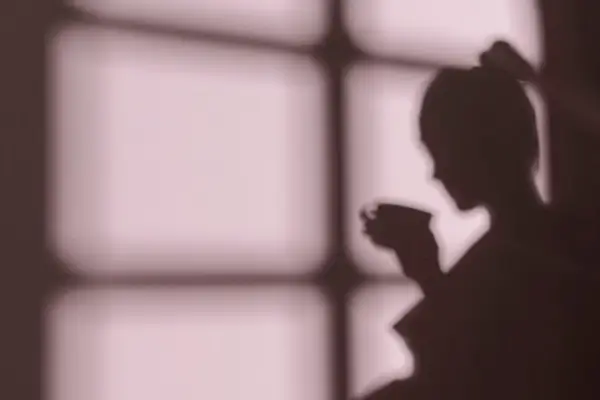
- Backlight: When the light comes from behind the subject, it creates silhouettes, rim lighting, or a glowing effect, depending on exposure settings. Backlighting can add a sense of mystery or enhance the three-dimensional feel of a scene.
Hard vs. Soft Shadows and Their Impact on Depth
Shadows define the shape and form of subjects in an image. The quality of shadows is influenced by the size of the light source and its distance from the subject:
- Hard Shadows: Created by small or direct light sources, such as the sun on a clear day or a bare bulb. These shadows have well-defined edges and produce high contrast, adding drama and a sense of sharpness to an image.
- Soft Shadows: Formed by larger or diffused light sources, like an overcast sky or a softbox. Soft shadows have gradual transitions and create a more natural, flattering look with smoother depth.
Understanding when to use hard or soft shadows can help you achieve the desired mood and dimensionality in your photos.
Natural vs. Artificial Light Sources
Choosing between natural and artificial light affects the final look of an image:
- Natural Light: The sun is the most common natural light source, offering a variety of lighting conditions throughout the day. Golden hour (shortly after sunrise or before sunset) provides warm, soft lighting, while midday sunlight produces harsh shadows and high contrast.
- Artificial Light: Studio lights, LED panels, and even household lamps provide controlled lighting options. Artificial light allows photographers to shape shadows precisely, regardless of the time of day.
Each light source has unique characteristics, and combining them creatively can lead to compelling images with a well-balanced interplay of light and shadow.
By mastering light direction, shadow quality, and different light sources, you can enhance depth and atmosphere in your photography, making your images more engaging and visually dynamic.
Choosing the Right Lighting for Depth
Lighting plays a crucial role in creating depth and dimension in photography. By understanding how different types of lighting interact with your subject, you can control the way textures, contours, and shadows enhance the visual impact of your images. Here are three key lighting techniques that can help add depth to your photos.
How Side Lighting Enhances Textures and Contours
Side lighting is one of the most effective ways to emphasize depth and dimension in photography. When the light source comes from the side rather than the front or back, it creates strong contrasts between highlights and shadows, revealing the texture and shape of the subject.
- Best Use Cases: Portraits, still life, landscapes, and architectural photography.
- Effect on Depth: Enhances the appearance of rough or uneven surfaces, making them stand out.
- How to Achieve It: Use natural window light coming from the side, or place an artificial light source (such as a softbox or lamp) at a 90-degree angle from your subject.
Using Backlighting for Silhouettes and Dramatic Effects
Backlighting occurs when the main light source is positioned behind the subject, creating striking silhouettes and adding a sense of separation between the subject and the background. This technique is commonly used to create a dreamy, ethereal feel in images.
- Best Use Cases: Portraits, nature photography, and storytelling compositions.
- Effect on Depth: Separates the subject from the background, adding a three-dimensional quality.
- How to Achieve It: Position your subject between the camera and the light source (e.g., the sun or a bright artificial light). Adjust your exposure to keep the background bright while allowing the subject to remain darker or silhouetted.
Diffused vs. Direct Lighting and Their Effect on Depth Perception
The quality of light—whether diffused or direct—can significantly influence depth perception in a photograph.
- Diffused Lighting:
- Creates soft shadows and gentle transitions between light and dark areas.
- Ideal for portraits and product photography, where even illumination is preferred.
- Can be achieved using softboxes, white curtains, or shooting on an overcast day.
- Direct Lighting:
- Produces sharp shadows and high contrast, adding a bold, dramatic look.
- Enhances the feeling of depth by making shadows more pronounced.
- Commonly used in street photography and creative editorial work.
Understanding how to use side lighting, backlighting, and the balance between diffused and direct lighting will help you create images with greater depth and impact. By experimenting with these techniques, you can develop a stronger sense of how light shapes your composition and adds dimension to your photography.
Composition Techniques for Effective Light and Shadow Use
Mastering composition is essential when using light and shadow to add depth to your images. Thoughtful placement of shadows and highlights can guide the viewer’s eye, create visual interest, and enhance the overall storytelling in a photograph. Below are three key composition techniques that leverage light and shadow effectively.
The Rule of Thirds and How Shadows Can Lead the Eye
The rule of thirds is one of the most fundamental principles of composition. By dividing your frame into a 3×3 grid and positioning key elements along the intersections, you create a visually balanced image. Shadows can play a crucial role in reinforcing this balance and guiding the viewer’s eye through the scene.
For example, if a strong diagonal shadow falls along one of the grid lines, it naturally leads the eye toward the subject. This technique is particularly effective in landscape and street photography, where elongated shadows can create movement and direction. Experimenting with how shadows interact with the rule of thirds can make a composition more dynamic and engaging.
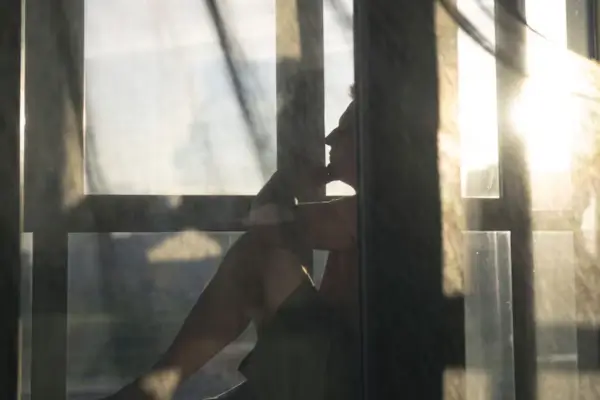
Chiaroscuro: The Artistic Use of Strong Light-Dark Contrast
Chiaroscuro is a technique borrowed from classical painting, where dramatic contrasts between light and dark create a sense of volume and three-dimensionality. In photography, this effect can be achieved by positioning a subject against a strong directional light source, such as a single window, a street lamp, or even candlelight.
This technique works well for portrait photography, where one side of the subject is illuminated while the other fades into darkness, creating a mysterious or moody effect. It can also be used in still-life photography to add drama and depth. Mastering chiaroscuro helps create striking, high-impact images that draw attention to the subject while maintaining a sense of intrigue.
Negative Space and Shadow Play
Negative space refers to the empty areas in a composition that help define the subject. Shadows can act as a form of negative space, shaping the way a viewer perceives the focal point of the image. By using deep shadows to isolate a subject or frame it within a bright area, photographers can enhance contrast and simplify the composition.
For instance, a lone silhouette against a dark, shadowed background creates an intense sense of isolation or mystery. Shadows cast by window blinds, tree branches, or architectural structures can introduce unique patterns and textures that add depth and complexity to an otherwise simple shot.
By intentionally incorporating shadows into your composition, you can create more visually compelling and thought-provoking images. Light and shadow are not just technical elements in photography—they are powerful storytelling tools that can evoke emotion, create drama, and guide the viewer’s experience of an image.
Camera Settings for Capturing Light and Shadow
Mastering camera settings is essential for effectively capturing light and shadow in your images. Adjusting ISO, shutter speed, aperture, metering modes, and white balance can significantly enhance contrast and depth. Below, we break down each element to help you achieve the best results.
Adjusting ISO, Shutter Speed, and Aperture for Better Contrast
Your camera’s exposure settings—ISO, shutter speed, and aperture—play a crucial role in how light and shadows are captured.
- ISO: A lower ISO (100–400) is ideal for well-lit environments, producing cleaner images with deeper blacks and richer details in the shadows. A higher ISO (800–3200 or more) can introduce noise, which may reduce the sharpness of shadow areas. However, higher ISO can be useful in low-light situations when you want to maintain details in both highlights and shadows.
- Shutter Speed: A faster shutter speed (1/500s or higher) can create well-defined shadows by freezing motion and preventing overexposure in bright areas. A slower shutter speed (1/30s or lower) allows more light to enter, which can soften shadows but may also result in motion blur if the subject or camera moves.
- Aperture (f-stop): A wide aperture (f/1.8–f/4) lets in more light, reducing contrast between highlights and shadows. A narrow aperture (f/8–f/16) increases depth of field and can enhance the definition of shadows and textures, making images appear more three-dimensional.
Using Metering Modes to Expose for Highlights or Shadows
Your camera’s metering mode determines how it reads and balances light across the scene. Choosing the right metering mode helps control whether you expose for highlights or shadows:
- Spot Metering: Measures light from a small, focused area (often the subject). This is useful when shooting high-contrast scenes, ensuring that either shadows or highlights are correctly exposed without compromising details.
- Evaluative (Matrix) Metering: Analyzes the entire frame to balance exposure. It’s ideal for evenly lit scenes but may struggle with extreme highlights and deep shadows.
- Center-Weighted Metering: Prioritizes the center of the frame while considering surrounding light. It’s useful for portraits or subjects where balanced exposure is key.
For dramatic light and shadow effects, use spot metering to expose for highlights in high-contrast images (such as silhouettes) or shadows in low-light environments.
White Balance and Its Effect on Light Tones
White balance (WB) affects how warm or cool the light appears in your photos. Adjusting WB can enhance the mood of your shadows and highlights:
- Auto WB: Works in many situations but may neutralize the dramatic effect of strong warm or cool tones.
- Daylight WB: Enhances natural tones in outdoor lighting, maintaining balanced contrast.
- Tungsten WB: Adds a cooler, bluish tone, which can make shadows feel deeper and more dramatic.
- Shade WB: Warms up shadows, making them appear richer and less harsh.
For creative control, manually adjusting white balance in post-processing allows you to fine-tune the warmth or coolness of light and shadow areas to match your artistic vision.
Final Tip:
To get the best balance between highlights and shadows, use Exposure Bracketing, which captures multiple exposures of the same scene at different settings. This technique is particularly useful for HDR photography, where blending different exposures can create a well-balanced final image.
By mastering these camera settings, you can take full control of how light and shadow shape your images, adding depth and drama to every shot.
Enhancing Light and Shadow in Post-Processing
Post-processing plays a crucial role in refining light and shadow effects to enhance depth in your images. With tools like Adobe Lightroom and Photoshop, you can adjust contrast, manipulate highlights and shadows, and even create artificial lighting effects to emphasize depth and mood.
Adjusting Contrast, Highlights, and Shadows in Lightroom/Photoshop
One of the simplest yet most effective ways to add depth to an image is by fine-tuning contrast, highlights, and shadows:
- Contrast: Increasing contrast makes the dark areas darker and the bright areas brighter, creating a more dramatic depth effect. However, excessive contrast can cause loss of detail in highlights and shadows. A balanced adjustment helps maintain a natural look.
- Highlights & Shadows: Adjusting highlights can prevent overexposed areas from losing detail, while lifting shadows helps recover hidden details in dark sections. In Lightroom, the Tone Curve panel provides even finer control over these adjustments.
- Whites & Blacks: Tweaking white and black levels ensures the image maintains a full tonal range, preventing it from looking flat or washed out.
Using Dodge and Burn Techniques for Depth
The Dodge & Burn technique is a classic method used by photographers to selectively brighten or darken parts of an image, enhancing depth and guiding the viewer’s eye.
- Dodge (Brightening): Lightening specific areas can simulate natural light hitting a surface, emphasizing textures and contours.
- Burn (Darkening): Darkening certain areas deepens shadows, adding dimension and contrast.
- How to Apply: In Photoshop, create a new layer, set it to Soft Light, and use a soft brush with a low-opacity white (for dodging) or black (for burning). Alternatively, use the Dodge & Burn tools in a non-destructive workflow by working on a 50% gray layer.
Adding Artificial Light and Shadow Effects in Editing
If the lighting conditions weren’t ideal during the shoot, post-processing can help simulate natural light sources and shadows.
- Radial & Graduated Filters in Lightroom: These tools allow you to add directional light or shadow effects subtly. For example, placing a radial filter with increased exposure on one side of the image can mimic sunlight coming through a window.
- Light Flares & Glow Effects: Photoshop’s Gradient Tool and Lens Flare filter can add warm, glowing effects, enhancing depth and atmosphere.
- Custom Shadows: Creating shadows manually in Photoshop (using a soft brush with a dark color and adjusting opacity) can help integrate objects into composite images more naturally.
By carefully adjusting contrast, highlights, and shadows, mastering dodge and burn techniques, and creatively adding artificial light and shadow effects, you can significantly enhance the depth and impact of your photos. Post-processing is a powerful tool that allows photographers to fine-tune their artistic vision and bring out the best in their images.
Practical Tips and Creative Ideas
Mastering light and shadow is not just about technical knowledge—it’s also about creativity and experimentation. Here are some practical techniques to help you enhance depth and drama in your images:
1. Experimenting with Window Light, Candles, and Reflectors
Natural window light is one of the most accessible and versatile lighting sources for creating depth in your images. Depending on the time of day and the angle of the light, you can achieve a variety of effects:
- Soft morning light for a gentle and diffused look.
- Harsh midday light for strong shadows and dramatic contrasts.
- Golden-hour window light for warm and directional illumination.
Candles are another excellent tool for adding mood and depth. The flickering light creates dynamic shadows, adding a sense of warmth and intimacy to portraits and still-life photography. Position multiple candles at different heights for a layered effect.
Reflectors help you manipulate light and shadow by bouncing illumination onto darker areas of your subject. You can use professional reflectors or simple DIY alternatives like white foam boards or aluminum foil to control light intensity and fill in shadows naturally.
2. Shooting During Golden Hour and Blue Hour for Natural Depth
The golden hour—shortly after sunrise and before sunset—offers soft, warm, and directional lighting that enhances textures and depth without creating harsh contrasts. Shadows are elongated, adding a three-dimensional feel to landscapes, portraits, and cityscapes.
The blue hour, which occurs just before sunrise and after sunset, provides cool-toned, atmospheric lighting. The subtle contrast between the deep blue sky and artificial city lights can create stunning compositions, particularly for urban and night photography.
To make the most of these periods:
- Use a wide aperture (f/2.8 – f/5.6) for a dreamy, softly lit background.
- Adjust your white balance to maintain the warm or cool tones you desire.
- Experiment with silhouettes by placing your subject against the light source.
3. Using Props Like Blinds or Lace for Creative Shadow Patterns
Shadows don’t just add depth—they can also serve as unique compositional elements. Props such as window blinds, lace fabrics, or even tree leaves can create intricate shadow patterns that add a layer of artistic storytelling to your images.
- Window blinds: Create strong linear shadows, perfect for dramatic portraits.
- Lace fabric: Produces delicate and artistic patterns on the subject’s face or background.
- Foliage shadows: Add an organic and mysterious touch, especially in nature photography.
To achieve the best effect:
- Place your light source (natural or artificial) at an angle for stronger contrast.
- Experiment with different distances between the light, the object, and the subject.
- Adjust your camera exposure to balance the highlights and shadows for maximum impact.
Light and shadow are powerful storytelling tools in photography. By experimenting with different light sources, shooting during optimal times, and incorporating creative shadow patterns, you can add incredible depth and emotion to your images. Don’t be afraid to try new techniques and push the boundaries of your creativity!
Conclusion
Mastering the interplay of light and shadow is a powerful way to add depth and dimension to your images. By understanding how different light sources, angles, and intensities affect a scene, you can create more visually compelling photographs. Techniques like side lighting for texture, backlighting for silhouettes, and chiaroscuro for dramatic contrast can significantly enhance your compositions. Additionally, refining your exposure settings and leveraging post-processing tools can further elevate your work.
The key to improvement is experimentation. Try shooting at different times of the day, using various light sources, and playing with shadows to see how they transform your images. Don’t be afraid to step outside your comfort zone and explore creative ways to manipulate light.
Now, it’s your turn! Have you experimented with light and shadow in your photography? Share your images or ask questions in the comments below—we’d love to see your work and help you refine your techniques!